Build A DIY Bookshelf At Home
In this article we will show you some original and simple ideas with which you can make your own bookshelf. Try it out for yourself today!
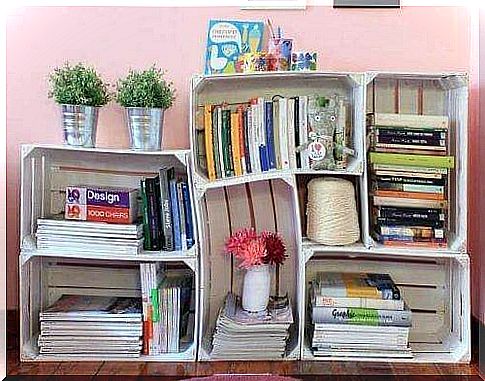
Bookcases are extremely useful for storing a variety of items. They also help you get the most out of your wall. Nowadays, people often make their own beautiful and creative DIY bookshelf.
Often times we feel that there aren’t enough options to organize our home because we have so many things. That is why furniture that offers organizational space and at the same time does not take up much space is very popular.
Books are valuable objects that we need to keep properly. After all, we can’t just store them somewhere.
Moisture, insects and other other factors can affect them. On the other hand, improper storage can destroy the spines or they can deteriorate in some other way.
However, once we have established a place for them, we need to think about how to organize them. Do we do this by color, in alphabetical order, by size, by edition or by genre? Are we arranging them horizontally or vertically?
With a good bookcase, you can organize your books in a pleasant and useful way.
In fact, they also give us the option to put some other objects on top of it. These objects complement our books and also beautify the room. There are no limits and you can arrange all kinds of things on bookshelves, from vases to small ornamental figures.
One bookshelf, many styles
A bookcase is made up of overlapping elements that are attached to the wall. These elements allow you to place different objects on it. The style of a bookcase depends on the materials available.
In this article, we’re going to introduce you to two different DIY bookcases that can help you save space in your home.
1. Classic DIY bookcase

This type of shelf is very simple, but still highly functional. Classic bookcases are usually attached to the wall with a shelf bracket or bracket to hold them in place.
materials
- 1 drill
- Screws
- A ruler or tape measure
- Dowels (in the width of the screws used)
- 2 shelf supports (the brackets can be made of wood or metal, depending on your preference)
- A wooden plate 15 cm deep and 1 meter long
Here’s how to build your own classic DIY bookshelf
The procedure is very simple.
- First, just select the wall you want to attach the shelf to. Then mark the place where you want to attach the shelf. Use the ruler or tape measure to do this. Then make sure that the markings are equidistant.
- Then use a pencil to mark the position of the shelf brackets on the wall. At the same time, take the opportunity to mark the position where you want to screw them in.
- Then drill the corresponding holes in the markings where you want to screw the brackets. Then insert the dowels and then screw the brackets to the wall.
Then check that the shelf is stable and straight. Finally, place the wooden plate over the shelf brackets and you’re good to go. If you need more storage space, repeat the above construction method as often as you want.
2. DIY floating bookcase

This type of bookcase has shelf brackets that are invisible or hidden so that it looks like it is “floating” on the wall.
You will need the following materials and tools to make this DIY bookcase:
- pencil
- brush
- drill
- White color
- white glue
- 12 4 cm nails
- 1 ruler or tape measure
- 8 long screws (6 cm)
- A 1 meter long and 4 cm x 4 cm thick wooden strip (marked # 1)
- A 1 meter long, 15 cm deep and 2 cm thick wooden plate (marked with # 2)
- A wooden strip 1.04 meters long, 4 cm deep and 2 cm thick (marked # 3)
- Two 15 cm long, 4 cm deep and 2 cm thick wooden strips (marked with # 4 and # 5)
Here’s how to make your DIY floating bookcase
- First, arrange the materials and then select the load-bearing wall. Then mark the position and height of the shelf on the wall. Use the wooden strip marked # 1, which serves as a support rail for the shelf.
- Make sure it’s completely horizontal. Make 4 marks every 10 inches on this line to indicate where the screws will go on the wall.
- Then take the wooden board # 2 and place it at the end of the wooden strips # 4 and # 5. To do this, apply some glue to one side and then glue it to the wooden strip # 1. Then secure the whole thing with 3 nails that are 5 cm apart.
- Then take the wooden strip # 3 and place it on the front edge of the wooden board # 2, repeating the same process on the sides, with the difference that the nails are 20 cm apart.
- In this step, the wood board already has three edges, two sides and the front. Now is the time to pick up the brush and paint all sides white. Also color in the wooden strip # 1 that will be the mounting rail.
- Drill the holes in the wall and wood strip # 1 and secure them to the wall with wall plugs and screws.
- When you are finished, attach the wooden board # 2 with its edges to the rail by screwing it into place at 4 points 20 cm apart.
And hey presto, your floating bookshelf is ready!
You can use these tips for inspiration to make original DIY bookcases at home. It all just depends on your taste and how your rooms are designed. Whichever you choose in the end, your own DIY bookcase will be really functional.
We wish you a lot of fun doing DIY!